
On this page
On this page
Jump to a section
To set up IPTV, you pick a device, get a login from an IPTV Canada provider, install a free player app from the device’s official store, and type the login into the app. That is the whole job, and the first time takes 15 to 30 minutes. The login arrives in the welcome email for your IPTV Subscription, and the device is very often the TV or streaming stick you already own. This guide walks through the four steps in order, then the ten minutes of settings that make the guide pleasant to use.
1. Step 1: Pick Your Device
Use what is already plugged into your TV if it can run a player. This table shows how easy each device is and where its full walkthrough is:
| Device | Player we recommend | How easy | Full guide |
|---|---|---|---|
| Android TV, Google TV, Chromecast, Sony Bravia | TiviMate from Google Play | Easiest | Android TV and Google TV |
| Apple TV, iPhone, iPad | IPTVX from the App Store | Easiest | Apple TV, iPhone and iPad |
| Fire TV Stick or Cube | TiviMate through Downloader | Easy, one extra step | Firestick |
| Samsung smart TV | A player from Samsung Apps | Medium | Samsung |
| LG smart TV | IPTV Smarters Pro from LG’s Apps | Medium | LG |
| Roku | IPTVplayerio, or a stick on HDMI | Medium | Roku |
If you need to buy something, a Fire TV Stick 4K Plus or a Google TV Streamer is the simplest way to turn any TV with an HDMI port into an IPTV screen. Windows PCs, Macs, PlayStation and Xbox consoles and dedicated boxes such as MAG, Formuler and BuzzTV are covered in our IPTV Guide.
2. Step 2: Get IPTV and Your Login
To get IPTV in Canada, you sign up with a provider, ideally after a trial, and it emails you the login in one of two forms:
- Xtream Codes: a server address, a username and a password. The app uses these three fields to load channels, films, series and the TV guide on its own. Use this whenever the app offers it.
- M3U link: one long web address holding the whole playlist. It works in almost every player, but the guide often needs a separate EPG link.
Copy the details instead of typing them from memory: a capital letter typed in lowercase is the most common reason a first login fails. Our post on where to get an IPTV URL explains each part of the login.
When you compare plans, look at connections: how many screens can stream at the same time. One TV needs one; a TV and a phone playing at once need two.
3. Step 3: Install a Player App
The player is a free app that shows your channels, guide and on-demand library. It ships empty: everything inside comes from your login.
- Open your device’s official store: Google Play, the App Store, Samsung Apps, LG’s Apps store or the Roku Channel Store. On a Fire TV Stick, TiviMate comes from its official site through the free Downloader app.
- Search for the player from the table in step 1 and check the developer’s name before you install.
- Install it and open it once.
Never install a player from a link in a video description, a chat group or a file sharing site. “Modded” and “premium unlocked” copies are how malware reaches streaming sticks, and a real player never comes with channels already inside. Our best free IPTV apps post compares the options for each device.
4. Step 4: Enter Your Login
The wording differs by app, but the fields are the same everywhere:
- Choose Add playlist, Add user or Login with Xtream Codes API, then the Xtream Codes option.
- Type any name for the playlist, such as “Living room”.
- Enter the server address exactly as your email shows it, including
http://orhttps://and the port number after the colon. - Enter the username and password. Both are case sensitive, and text pasted from an email sometimes brings a space at the end.
- Save, and wait a minute or two while the channels and guide load. Most players then open on a home screen with Live TV, Movies and Series.
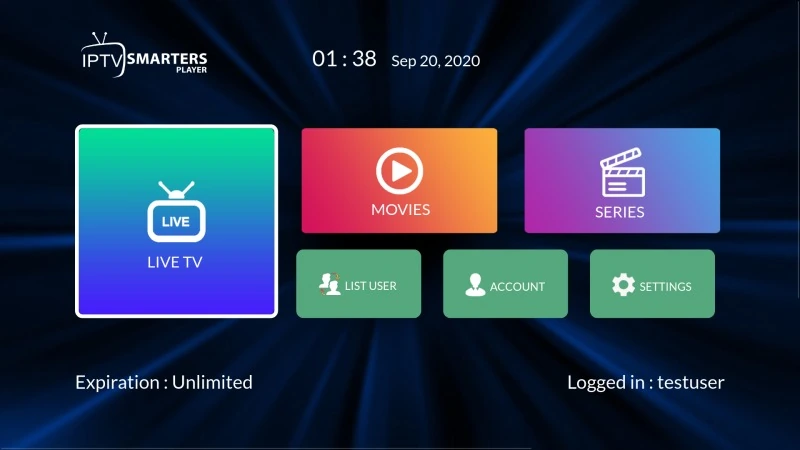
If the app only takes an M3U link, paste the whole link instead, and add the EPG link in the guide settings if there is one. Typing on a TV is the slow part: the Fire TV and Google TV phone apps include a keyboard, and an iPhone can type for an Apple TV.
5. Your First Ten Minutes in the TV Guide
These settings turn a long channel list into something you can browse with a remote:
- Time zone first. Canada spans six time zones. If programmes show an hour or three off, fix the device’s time zone, then the app’s guide offset.
- Favourites. Press and hold a channel and add it. Twenty channels you actually watch beat two thousand you scroll past.
- Hide categories you never open, such as language packs or regions you don’t watch. The guide loads faster.
- On demand: films and series usually sit in their own tabs.
- Parental PIN if children use the TV.
6. Get the Connection Right
Most beginner problems are network problems, and the fixes are simple:
- Use a cable or 5 GHz Wi-Fi. A stick behind the TV sits behind metal that blocks Wi-Fi, so use the HDMI extender from its box.
- Plan on about 10 Mbps per HD stream and 25 Mbps per 4K stream. Most Canadian cable and fibre plans clear that easily.
- Test in the evening. Networks are busiest between about 7 p.m. and 11 p.m., so run a CIRA speed test then, not at noon.
- Watch data caps. An hour of HD uses about 3 GB and an hour of 4K about 7 GB.
- Restart weekly. Sticks and TVs fill their memory over a week of use.
You do not need a VPN, a “jailbroken” stick or any special box. Our post on whether you need a VPN for IPTV explains the few cases where one helps.
7. Fix the Common Beginner Problems
| What you see | What it usually means | What to do |
|---|---|---|
| “Invalid login” or an empty channel list | A typo, a missing port or an expired trial | Copy the details again and check the plan is active |
| Buffering in the evening only | Busy network or weak Wi-Fi | Cable or 5 GHz Wi-Fi, lower the quality |
| Channels play but the guide is empty | Missing EPG link or wrong time zone | Add the EPG link, fix the time zone, refresh |
| Black screen with sound on one channel | A video format the app struggles with | Try the channel in a second player |
| “Max connections reached” | Another device on your account is streaming | Stop the other stream or choose a plan with more connections |
For anything else, our checklist for IPTV that stops working finds the cause in about five minutes. If the login is right and the plan is active, IPTV Support can check the account from their side.
8. What IPTV Is, in Plain Terms
IPTV is television delivered over your internet connection instead of a cable line or a satellite dish. A provider runs servers with live channels, films and series; the player app on your device logs in to those servers and shows a channel list, a TV guide and a video player, much like a cable box would.
What confuses most beginners is that the app and the service are separate. The app is a free player you install; the service is the subscription you pay for. That separation is why you can use your own TV and your own player instead of renting a box. It also means the legal question is about the service, not the app, as our post on whether IPTV is legal explains.
Frequently Asked Questions
How do I get IPTV?
Sign up with a provider, ideally after a free trial, and it emails you a login. Install a player app from your device’s official store and enter that login; Step 2 above explains the two kinds of login.
Do I need a smart TV for IPTV?
No. Any TV with an HDMI port works once you plug in a streaming stick, and you can also watch on a phone, tablet or computer.
Can I set up IPTV myself, or do I need a technician?
You can do it yourself. Installing a player and entering a login is about the same effort as setting up a streaming app with a password.
Can I use the same login on my TV and my phone?
Yes. Install a player on each device and enter the same details. Each one that streams at the same time uses one of the connections on your plan.
Do I need to keep my computer on for IPTV to work?
No. The player on your TV or stick connects to the provider’s servers directly, with nothing running on a computer.
What happens to my channels if I change devices?
Nothing. Your channels belong to your login, not to the device, so you install a player on the new device and sign in again.
Is IPTV the same as Netflix?
Both stream over the internet, but IPTV brings live channels with a TV guide as well as films and series, the way cable does, while Netflix is on demand only.
How do I know the setup worked?
The channel count appears after you save the login, and a live channel starts playing within a few seconds. If the count shows zero, recheck the login.
Conclusion
Setting up IPTV is four steps: a device, a login, a player from the official store, and the login typed into that player. Do it on a quiet afternoon, add your favourite channels and fix the time zone straight away, then watch something live that evening, when your network is busiest, to see how it holds up. If you have not chosen a service yet, an IPTV free trial lets you run the whole setup before you pay for anything.